
How To Use a Searing Burner On a Gas Grill Like a Pro Chef
Your gas grill has a dedicated searing burner onboard? If yes, then you’ve got everything you need to sear a restaurant-quality steak with a nice crust and perfect grill marks. However, if you don’t know how to use a searing burner on a gas grill, you may find it challenging to sear your foods.
Using a searing burner on a gas grill is pretty simple. Light up the grill burners and close the lid to allow it to pre-heat for approx. 15 minutes on 450°F to 500°F.
Now place your food on the cooking grate and sear each side of your food for 2-4 minutes. When done searing, move your food to the primary cooking grates to finish off cooking.
In our comprehensive guide below, you’ll uncover more helpful details about the dedicated searing station that comes with your gas grill. You’ll learn how to use it to make perfectly seared steaks for your family or friends.
What is a Sear Burner?
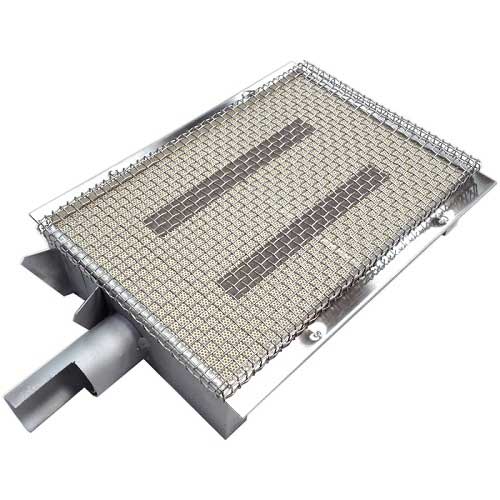
A sear burner is a gas grill add-on that heats up to extremely high temperatures to enable you to sear your steak, veggies, and other types of food that you want to sear. The searing station is dedicated to searing and gets hotter faster than the other sections of the gas grill, making it searing-ready.
For starters, searing simply means cooking the surface of meat or any other food quickly and at extremely high temperatures.
A typical sear station involves around 3 gas burners sitting closely together to create a zone that gets way hotter than other areas. This high heat concentration gives this zone superheat capabilities needed for fast searing results.
Note that you can get a gas grill that comes with a built-in searing station (these are usually high-end models and tend to cost you more). Or you can get one separately. In the case of a sear station that comes with the grill, it is usually situated by the side of the primary cooking grates in the grill.
What is The Purpose Of a Sear Burner?
The primary use for a sear burner is to sear and brown food, especially meat. It does this by generating high heat, which causes the sugars and proteins on the surface of the meat to caramelize and form a crispy, flavorful crust.
But besides letting your sear meats, does a sear burner have other uses? You may be surprised that this specialized zone has additional purposes it can serve.
For instance, you can use the sear burner as a side burner for boiling water. The searing burner works by infrared heating, which means the food gets direct heat contact. This makes it ideal for use as a side burner for boiling water. It also gets quite hot, making it the perfect platform for quickly bringing water to boiling temperatures.
You can also use it as a side burner for cooking other foods. In this case, you simply place the pan directly over the grates. Some users prefer taking off the sear station grates and sitting their pans/pots on the bars beneath. Whatever way you use it, the sear burner will serve as a highly convenient side burner for your cooking needs.
How to Use a Searing Burner On a Gas Grill: Step By Step
We gave you a quick answer on how to use a searing side burner at the beginning of this guide. In this section, we’ll go all in and break down the step-by-step process that you should follow to properly use your searing burner to sear a steak.
We assume that you already have the steak you want to sear at room temperature. If not, take it out of the refrigerator and let it sit for around 1-3 to get the chill off it. Once it’s ready, you can start the searing process below.
Step 1. Pre-heating the searing station
The first step is obviously turning on your gas grill as well as the searing station. You may want to consult your unit’s user manual on how to go about this part. Once it’s on, pre-heat the side burner on the high heat setting.
We also advise you to heat the main cooking grill at this point, but at a lower temperature of around 300F. Be sure to close the lid to prevent heat from escaping and quicken the pre-heat phase. This should take approx. 15 minutes.
Step 2. Prepping and seasoning the steak
As the searing station is heating up, grab the steak you wish to sear (remember, it should now be at room temperature). Lightly part is with a paper towel to dry it and then season it with salt and pepper.
Step 3. Putting the steak in the grill
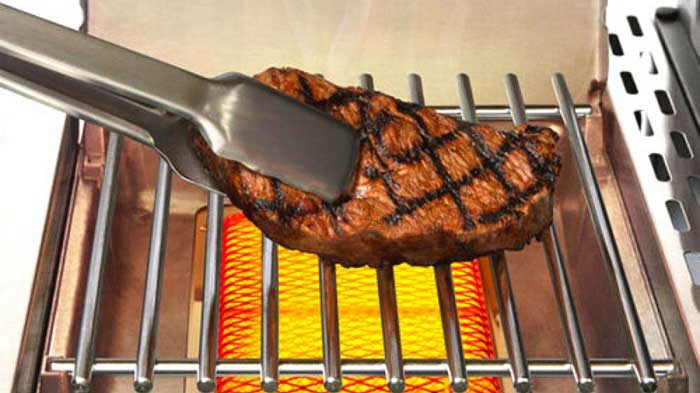
The grill is ready for the job, and your piece of protein is seasoned and ready. What’s next? It’s time to place the steak in your gas grill. You should get that searing sound the moment you place your steak on the grills, assuring you that it’s indeed searing time!
We advise you to put the steak at 45 degrees at first. Sear it at this angle for a minute and then turn it to 90 degrees and sear it at this angle for another minute. The reason you should follow these specific placement angles is to enable your steak to form those perfect-looking, restaurant-style grill marks.
Step 4. Flipping the steak to the other side
When two minutes of searing one side are over, turn the steak to expose the other side to the superheat for an additional minute. If your stick thickness is anything between 1 1/2- to 2-inches thick, consider searing the second side for up to 2 minutes.
Step 5. Finishing off the cooking process
The searing is done. But the meat isn’t yet at your desired level of doneness. So, you’ll now need to move it from the searing station to the main cooking grates to finish off the cooking. This will make your meat more delicious and easily digestive.
Remember to utilize a pair of tongs during the transfer process. You don’t want your fingers anywhere near the searing burner or the seared stick as it’s super-hot and can leave you with serious injuries.
In the main grates, the temperatures are lower, and the meat will cook with indirect heating. At this point, you can add more salt and pepper seasoning to the steak if you want. You’ll also need to close the lid at this point so that there’s enough heat to indirectly cook the meat to your desired doneness. Let the meat cook in this area for around 6-8 minutes. And make sure you flip the opposite side of the steak.
BONUS Step: Finish up the searing process
Having followed the 5 simple steps above steps, you should end up with a well-cooked steak. Get it off the grills when it’s done cooking and set it aside. Give it some time to cool down. Afterward, grab a sharp knife and cut it into slices to serve your family or friends.
Is The Sear Burner Worth It?
A sear burner is worth it if you want a convenient way to sear your grill. While you can still sear your meat and veggies with your grill, it will take longer, and you’re not always guaranteed perfect sear results.
A sear burner/station, on the other hand, is specially made for searing. It gives out excessive amounts of heat needed. This is the secret to quickly searing your food and giving it that crispy texture while sealing it with the grill marks—taking your bbq experience a notch higher!
FAQs:
1. What is an ideal temperature range for cooking while using a searing burner on a gas grill?
The ideal temperature range for cooking while using a searing burner is 400F to 500F. These high temps translate to the high heat needed to make a steak deep brown and form a nice crust.
2. How to avoid the problem of meat getting stuck on the grill of the burner?
The surest way to prevent the meat from sticking to the grill grates is to ensure the grates are clean before using them. Coating the grates lightly with cooking oil also helps prevent them from getting stuck. Starting the searing process before the grill grates are hot is also crucial to prevent the steak from sticking.
3. What is the reverse sear method? Is it good?
Reverse sear is a cooking method that involves slow cooking a steak at low temperatures and finishing off cooking with a high-temperature sear. Reverse sear has an advantage over normal sear in that it gets the steak more evenly cooked and lets you cook the meat to the ideal degree of doneness.
Final Verdict
The searing burner present on most popular gas grills like Weber is often the most misunderstood feature. Yet, it’s the ultimate key to unlocking perfect seared steak with those classic grill marks, nice crust, and delicious taste.
This specialized zone helps you perfectly sear your meat at extremely high temperatures and gives your food those grill marks you desire.
The process of using this specialized zone is quite straightforward. You pre-heat your sear station, put your seasoned steak on it and let it sear for a couple of minutes. Lastly, transfer the steak to the cooking grates to finish off cooking. Now that we have shown you how to use a searing burner on a gas grill, we have no doubt that you’re now ready to sear the restaurant-style steak in the comfort of your backyard.
Also Read:
Sear burners on built in grills can run at 1,400°. The one on my Newage Platinum Series grill hits that temperature in just a few minutes. There’s a steel plate that separates the searing burner from the main burners that aren’t built to tolerate such heat. Always keep the lid open when using one, otherwise you’ll damage the main burners, their ignitors and the thermometer, and you’ll even warp the enclosure. My previous grill was mishandled and that’s exactly what happened.
Thanks Adam to share your experience and valuable tips.